
Putting down a resin floor involves several steps. The mixing stage is very important. Get the ratios correct, and follow the manufacturer's instructions. Too much of one part, and the floor won't cure. You might get a sticky mess or a floor that cracks easily.
Next, consider the application. Rolling works for thinner coatings. Self-leveling resins level themselves. Still, guide them to spread evenly. Also, think about the substrate. For concrete, prep it well. Make it clean and dry. You might even prime it so the resin grabs on.
Thickness control also matters. Use enough resin for durability. Too much wastes material and weakens the floor. Finally, don't rush curing. The curing schedule exists for a reason. Trying to find a reliable Flooring Contractor in Denver business owners rely on for quality floor installation.. It might take days, but it gives the floor strength and resistance. Skip it, and you might get stains and scratches.
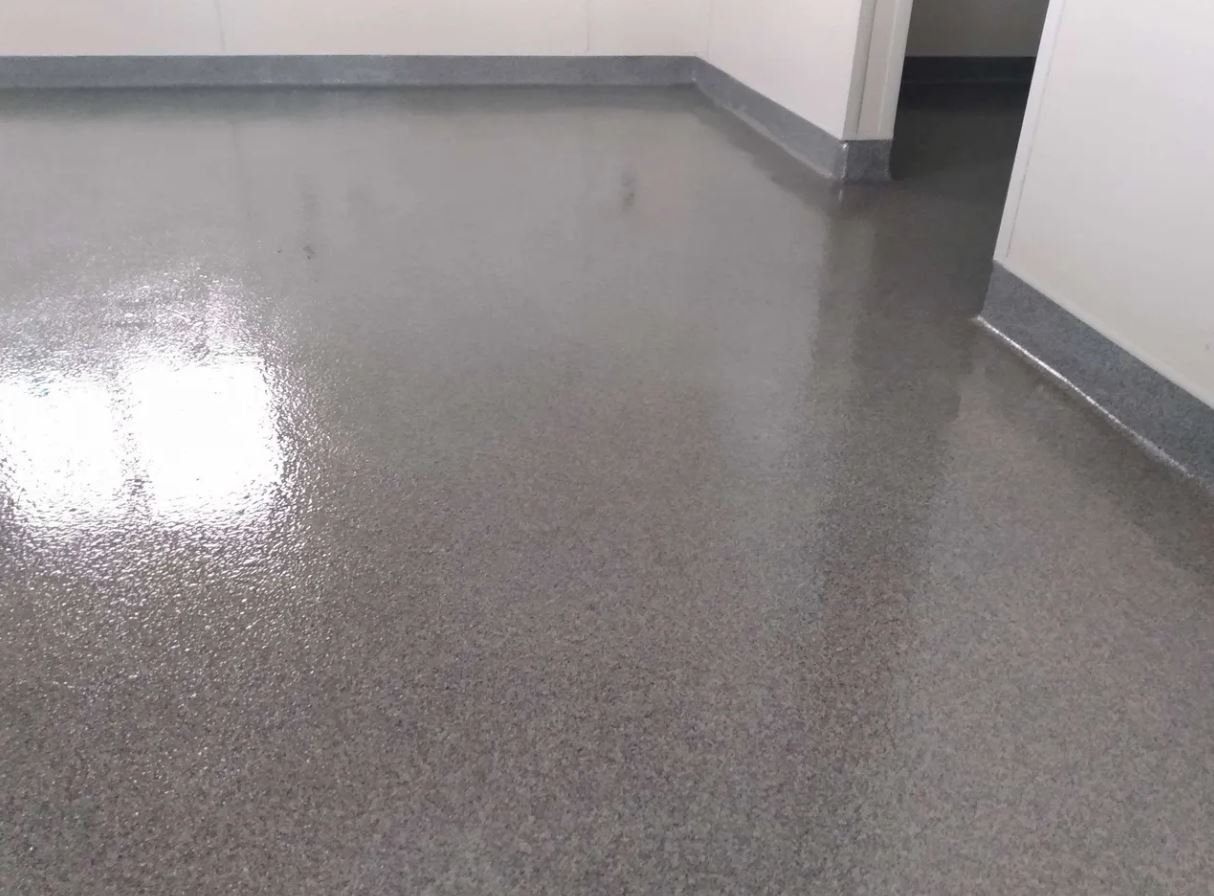
Skilled application is essential to achieve a seamless and durable resin floor. Factors like proper mixing ratios, consistent film thickness, and appropriate curing times all play a critical role. Hiring experienced professionals can minimize the risk of errors and ensure a long-lasting, aesthetically pleasing result.
Selecting the correct type of resin is crucial for specific application environments. Epoxy, polyurethane, and polyaspartic resins offer varying levels of chemical resistance, abrasion resistance, and flexibility. Consider factors like foot traffic, chemical exposure, and temperature fluctuations when making your choice.
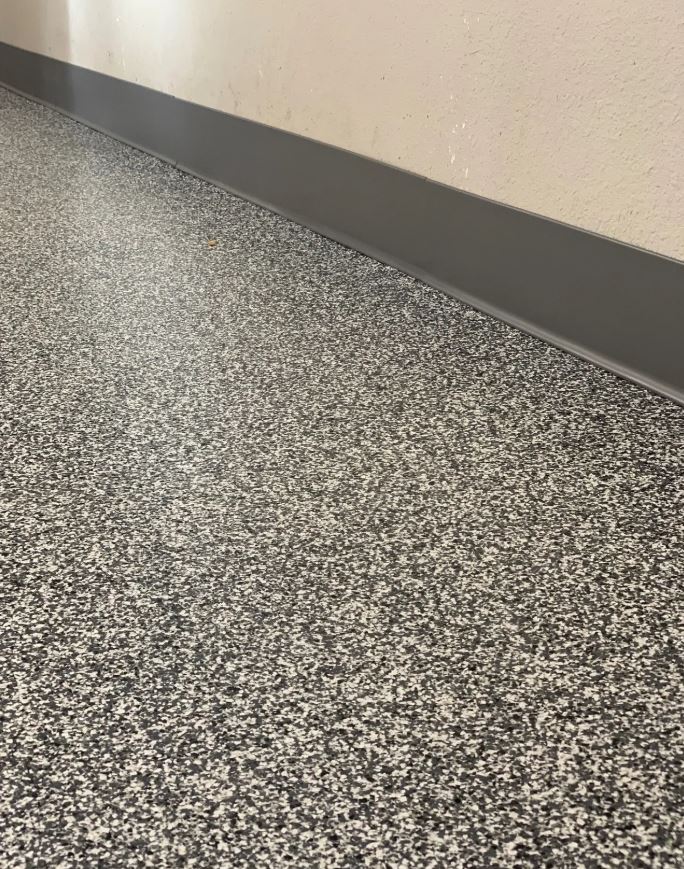
Proper surface preparation is paramount for long-term resin flooring durability. This includes thorough cleaning, grinding, and profiling of the substrate to ensure optimal adhesion. Ignoring this step can lead to premature failure, such as peeling or blistering, regardless of the quality of the resin used.
When you install a resin floor, keep a few things in mind for the best outcome. First, know the type of resin. Epoxy works well for garages or places that need to be tough. Polyurethane is more flexible, so it works in places with movement or vibration.
Mixing is key. Follow the maker's directions exactly. Don't guess. Too much of one part, and the floor might not cure right or could become brittle. Rolling is straightforward, but ensure even coverage. Overlap strokes a bit to avoid thin spots. Self-leveling is nice because the resin does most of the work, but you still need to guide it with a squeegee to make sure it spreads evenly.
Thickness also counts. If you go too thin, it won't be durable enough. Too thick, and it might crack or take a long time to cure. Speaking of curing, stick to the schedule. Don't walk on it before it's ready, or you'll mess it up. A good resin floor should be smooth and stain-resistant and hold up to whatever you do to it, whether in your house or a commercial space.
Resin coating application begins with proper mixing. Precisely follow the manufacturer's instructions for the resin and hardener ratios. Too much or too little of either can affect the curing process, leading to a weak or tacky finish. Use a mechanical mixer to ensure everything is combined. Scrape the sides and bottom of the container to get rid of any unmixed material. This ensures a consistent chemical reaction and optimal coating performance.
Rolling is a common way to apply coatings, especially for larger areas. Use a high-quality roller designed for epoxy or polyurethane coatings. A cheap roller can shed fibers and ruin the finish. Apply the resin in even, overlapping strokes to avoid roller marks or thin spots. Watch out for pooling, especially in corners and low spots. Redistribute excess material fast. Multiple thin coats are better than one thick coat. They reduce the risk of bubbles and ensure a more uniform cure.
Self-leveling resins are great for creating smooth floors. After pouring the mixed resin onto the prepared surface, use a notched squeegee to spread it evenly. The notches help control the coating thickness. Then, use a spiked roller to remove any trapped air bubbles. Work fast, as self-leveling resins have a limited working time before they start to set. This way is great for a professional, high-gloss finish.
Getting the right thickness matters for durability and looks. If it's too thin, the coating won't protect well enough. If it's too thick, it can crack or cure wrong. Use a wet film thickness gauge during application to ensure you're meeting the manufacturer's specs. Keep in mind that the required thickness can vary depending on the type of resin and the floor's use. Regular checks during application can prevent mistakes.
Curing is when the resin hardens and gets its full strength and chemical resistance. Temperature and humidity affect the curing time. High humidity can cause clouding or surface flaws. Always follow the manufacturer's curing schedule. Don't rush it by applying heat unless the product is made for that. Using the floor before it's fully cured can cause damage and shorten its life.
You picked your resin. Now, apply it. How you apply it depends on the resin and what you’re using the floor for. For a busy commercial space, you need a thicker, tougher coat than for a home garage.
Mixing matters. Follow the maker's directions closely. Don't guess. Too much hardener makes it cure too fast and crack. Not enough makes it stay sticky. Use a good mixer, like a drill with a mixing paddle, and mix well.
Rolling is simple. Use a good roller and apply even coats. For self-leveling resins, pour it out and let it spread. You might need a gauge rake to help. Watch for bubbles! A spiked roller can remove them.
Thickness counts. If it is too thin, it won't last. If it is too thick, it might not cure right. Note the recommended thickness for your resin and use.
Curing times are key, especially in Denver where the temperature changes a lot. If it is too cold, it will take a long time to cure. If it is too hot, it can cure too fast and cause issues. Watch the temperature and humidity, and change your time as needed. Keep people off it until it is fully cured, or you will get footprints and marks.
You have your resin and hardener ready. The mixing ratio is key. Follow the manufacturer's instructions. Do not estimate. Too much or too little hardener can cause failure. It might not cure right, or it will become brittle and crack. Use a mixing container and a mixing stick. Scrape the sides and bottom as you mix. This ensures everything mixes fully.
Now, let's talk application. For a self-leveling epoxy, pour it in ribbons across the floor. Then use a notched squeegee to spread it evenly. The notch size sets the thickness, so check the manufacturer's advice. Do not dump it all in one spot!
If you are adding flakes or quartz, do it right after applying the base coat, while it is still wet. Toss them in the air so they fall evenly.
Bubbles are a common issue. A spiked roller can remove them. Go over the surface while the epoxy is still wet. Curing time also matters. Keep the area clean and at the right temperature. If it is too cold, it will not cure. If it is too hot, it might cure too fast and cause issues. Always check the product's data sheet for temperature and humidity advice during curing. Rushing any of these steps can cause issues. You might see delamination, uneven spots, and a floor that does not last.
Concrete Moisture Testing: Key Steps Before Epoxy Installation
Resin coating application is where it all comes together. You can have great materials, but application errors ruin everything. Mixing matters most. Follow the manufacturer's instructions exactly. Too much or too little of one part ruins the whole thing.
Rolling seems simple, but watch for bubbles. Use a spiked roller to remove them while the resin is wet. Self-leveling is trickier. First, make sure the base is level, or you just move the problem.
Thickness control also matters. You want enough resin for durability, but too much risks cracks or other problems. Use a gauge rake to spread it evenly.
Curing schedules? Don’t hurry. Temperature and humidity are important here. In Denver, with our wild weather, pay close attention. High humidity slows curing, and extreme temperatures cause uneven or fast curing.
If it's too cold, the resin might not cure right, leaving a soft, sticky mess. If it's too hot, you might get bubbles or surface flaws. Apply the coating when the temperature is mild and the humidity is low. If you can't control the weather, adjust your resin mix or use additives. Also, protect the surface from wetness while it cures. A little rain ruins everything.
Let's discuss applying resin coatings. It's more involved than painting. Mixing, rolling, and self-leveling come into play, depending on the resin. The substrate matters, too. Is it concrete, wood, or tile?
For good results, mixing ratios are key. Too much hardener causes cracking from fast curing. Not enough leaves a sticky surface. Use a good scale and measure with care.
Rolling seems simple, but watch for bubbles. A spiked roller helps, especially with thicker coatings. Self-leveling epoxies make a smooth surface, but work fast and ensure the floor is level.
Thickness control also matters. If it is too thin, it won't withstand wear. If it is too thick, it might crack during curing. Check the specs and use a gauge to stay on target.
The curing schedule is also important. Don't rush! Allow full curing before use. Temperature and humidity affect curing time, so read the instructions. A mistake here results in a soft, dented floor that is hard to fix.
When done right, you get a seamless, stain-resistant floor that handles a lot of wear, in a garage or a kitchen. Skip steps or get sloppy, and you invite problems.
Let's discuss applying resin. It's not complex, but errors can happen. First, mixing is key. Follow the manufacturer's instructions precisely. Correct ratios are important. Otherwise, the resin won't cure right. You could end up with a sticky mess or a floor that cracks fast.
Rolling is simple. Overlap each pass to avoid thin spots. For self-leveling resins, which create a smooth finish, use a notched squeegee to spread it evenly. Watch for air bubbles! A spiked roller works best here. Go over the wet surface to pop bubbles.
Thickness is also important. If it is too thin, it won't last. If it is too thick, it might not cure fully. Follow the manufacturer's specs again. Curing should not be rushed! Keep people off the floor for the recommended time. Temperature and humidity affect curing time, so watch them. If you take shortcuts, you waste money. The floor will peel, stain, and look bad faster than it should.
Let's discuss how to get resin coating right. It's more than just applying material to the floor. Mixing is important. Follow the manufacturer's instructions exactly. If you get the ratios wrong, your floor won't cure correctly. It might stay sticky, or it could crack later.
Rolling is another thing people mess up. For even coverage, use a good quality roller designed for epoxy. Don't press too hard, and overlap each pass a bit. Watch out for bubbles!
Self-leveling is neat, but it's not magic. You still need to spread the resin evenly. Use a gauge rake to get the right thickness. This is important for durability. If it's too thin, it'll wear out fast. If it's too thick, it might not cure all the way through.
What about curing schedules? Pay attention! Temperature and humidity affect curing time. Don't rush. Let the floor cure completely before you walk on it or put anything heavy on it. Otherwise, you'll end up with dents and marks.
We want floors that can handle anything, whether it's kids, pets, or heavy foot traffic in a commercial space. Stain resistance matters, so choose a resin designed for that. It makes a big difference later.
Applying resin coatings goes beyond simple painting. It involves a chemical process, so mixing and application are important. Incorrect mixing can keep the coating from curing. This can create a soft, sticky mess or cracks.
Rolling ensures even coverage. Use the correct roller type, like a notched squeegee and spiked roller, to release trapped air. Self-leveling works well with thicker coatings. You pour the mixed resin onto the floor and guide it with a gauge rake. Gravity does most of the work. Even with self-leveling, watch to ensure even spreading, especially in corners and around drains.
Thickness control matters. If the coating is too thin, it won't resist wear. If it's too thick, cracking or poor curing could happen. Always follow the manufacturer's thickness advice based on the use. Residential floors need less than a warehouse floor used for forklifts.
Curing schedules must be followed. Resin coatings need time to harden. Temperature and humidity affect this. Cold or humid conditions slow curing and weaken the final product. Rushing the cure can cause bubbles, discoloration, or a coating that never hardens. Always check the product data sheet for curing times and environmental conditions.
Let's discuss the process of applying resin. This goes beyond a simple paint job. Consider mixing, rolling, and sometimes self-leveling. The right technique depends on the resin type and the surface.
Mixing matters. Incorrect ratios prevent proper curing. The floor could stay sticky or crack. Rolling is usually simple, but even coverage is key. Avoid thin spots! Self-leveling resins simplify things, but you still guide them for even spreading.
Thickness control also matters. If it is too thin, it lacks durability. If it is too thick, curing takes too long, or overheating creates issues. Follow the manufacturer's curing schedule exactly. Don't rush!
What if you mess up? You could get an uneven floor that stains or falls apart. Not good, right? Get it right, and you'll have a seamless, lasting, and stain-resistant floor that looks great for years. Take your time and pay attention to detail. This is how you create a floor to handle heavy foot traffic in a business or the messes of a busy home.
When you apply a resin coating, several methods exist. The best one depends on the resin type and your goals. Mixing is key. You must get the ratios right, or the project fails. Follow the manufacturer's instructions closely.
Rolling works well, especially for thinner coatings. Use a good roller and ensure even coverage. Don't press too hard, or you will leave marks. Self-leveling resins spread out to create a smooth surface. Guide them with a gauge rake.
Thickness control matters a lot. If the coating is too thin, it won't last. If it is too thick, it might not cure right and could crack. Curing schedules also matter. Temperature and humidity affect curing. If it's too cold or humid, curing takes longer, and adhesion suffers.
The aim is a floor that resists stains and handles wear, whether in a business or home. Do it right, and the floor looks great for years. Get it wrong, and you will redo it soon.